How to Use Hollow Bit for Efficient Drilling Techniques?
In the world of drilling, efficiency is key. Hollow Bits are essential tools that enable precise and effective drilling techniques. According to Dr. Michael Stevens, a leading expert in drilling technologies, "Using a Hollow Bit can significantly reduce material waste while enhancing productivity." This statement underscores the importance of mastering hollow bit applications.
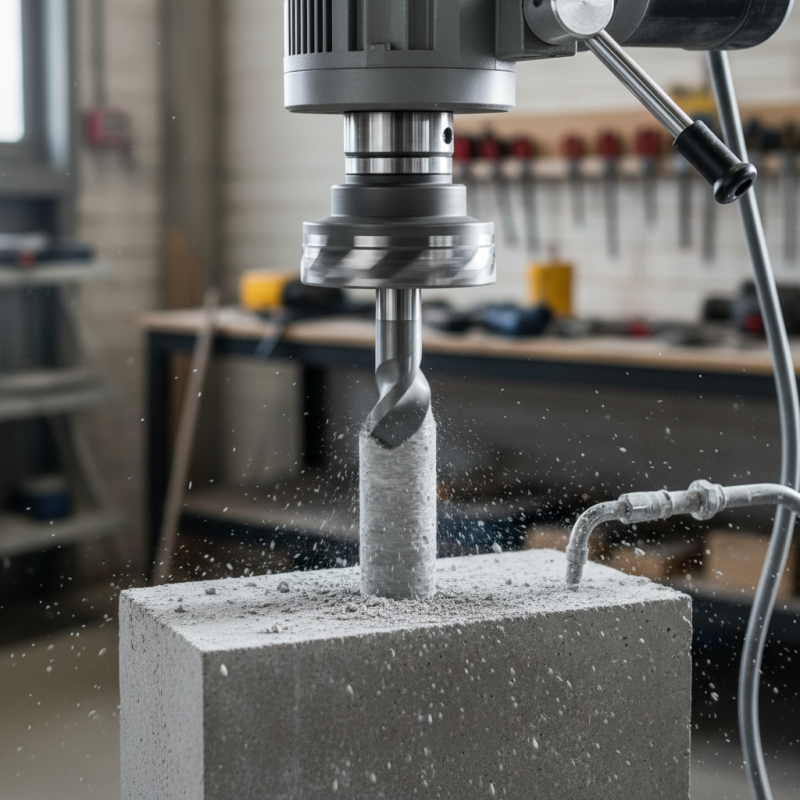
When applying hollow bits, understanding their unique design is crucial. These bits have a core that removes a cylindrical section of material, which allows for deeper and cleaner holes. However, users often face challenges such as incorrect bit selection or improper technique. Many operators overlook the importance of selecting the right size or type, leading to inefficiencies.
Practical knowledge can enhance effectiveness. Ensuring proper rotation speed and pressure is vital for optimal performance. Observations reveal that many users do not adjust their methods according to material types. This can result in subpar outcomes. Being aware of these nuances can elevate the drilling process when using hollow bits. Embracing continuous learning and reflection will lead to better results and innovations in drilling techniques.
Understanding the Hollow Bit: Definition and Purpose
Hollow bits stand out in drilling techniques. They are essential for creating clean, precise holes. The hollow center allows for efficient material removal. This design often results in a faster drilling rate. Industry reports indicate that hollow bits can increase drilling efficiency by up to 30%.
When using a hollow bit, material choice matters. Harder materials require careful control of speed and pressure. Too much force can damage the bit. Keep the drill steady for better results. Remember, not all bits are equal. Choosing the right bit for the task is crucial.
Tip: Regularly inspect your hollow bit for wear and tear. A worn bit can lead to poor performance. Always ensure proper lubrication during use. This can enhance lifespan and maintain drilling effectiveness. Efficiency can also depend on the drill's RPM settings. Adjusting speed may yield better outcomes.
Types of Hollow Bits: Selecting the Right One for Your Project
When selecting hollow bits for your projects, understanding the variety available is crucial. Different types of hollow bits serve unique purposes. For instance, masonry hollow bits are designed for drilling into hard materials like brick and concrete. They often involve a carbide tip, ensuring durability and efficiency. On the other hand, wood hollow bits, also known as dentists or auger bits, provide clean cuts in softer materials. Industry reports suggest that efficiency could improve up to 30% when the right bit is used.
Choosing the proper hollow bit is essential for optimal drilling. Look for bits with a sharp point for precision. Consider the material you will be working with. Not all bits can handle the same workload. Inadequate bit selection can lead to poor results and wasted time. Research shows that using the right diameter and length can affect the speed of your drilling operation.
Tips: Always maintain your drills. A dull bit can decrease performance. Regularly inspect the bit for wear. Additionally, ensure your drill speed matches the bit type. Too high speeds can result in overheating. Remember, practice makes perfect. Experiment with different bits to find what feels most comfortable for your projects.
Preparing Your Drill and Materials for Efficient Hollow Bit Usage
Preparing for efficient hollow bit usage involves careful planning and the right tools. Start by inspecting your hollow bit for any signs of wear or damage. A dulled bit can lead to increased friction, making drilling more difficult. Check your drill’s power and speed settings. Adjust them according to the material you are working with. Ensure the drill bit is securely attached. A loose fit can result in imprecise holes.
Gather the appropriate materials for your project. Use clamps or vise grips to stabilize your workpiece. This protects the material and your bit during drilling. Consider using a drill guide for increased accuracy. If you are drilling into harder materials, think about using a pilot hole. A smaller hole can help the hollow bit enter more smoothly.
Remember, it's okay to make mistakes. Each attempt teaches you something valuable. If you overheated the bit or created a rough hole, reflect on your technique. Adjust the pressure you apply and the speed of your drill. Learning from these experiences can lead to better outcomes in future projects. Pay attention to every detail; even small adjustments can profoundly affect your results.
Step-by-Step Guide to Drilling with a Hollow Bit
When using a hollow bit, it’s important to follow precise steps for efficiency. Begin by selecting the appropriate size for your project. Studies show that using the right bit size can improve drilling accuracy by up to 30%. Desirable outcomes include cleaner holes and reduced wear on tools.
Preparation is key. Secure the workpiece properly to minimize movement during drilling. A well-held piece reduces the risk of error. Check the drill speed settings as well. For instance, lower speeds work best with harder materials like metal. Using the correct speed can extend bit life and achieve better results.
As you drill, apply consistent pressure. An even force helps avoid bit binding. It’s essential to monitor the drilling depth. Many beginners overlook this step, leading to wasted materials. Regularly pulling the bit out to clear debris is a good practice. It keeps the hole clean. Finally, always inspect the bit after use. A damaged bit can lead to future issues. Reflecting on these steps will strengthen your skills over time.
How to Use Hollow Bit for Efficient Drilling Techniques? - Step-by-Step Guide to Drilling with a Hollow Bit
| Step Number | Description | Tips | Safety Precautions |
| 1 | Choose the right hollow bit size for the material being drilled. | Consider the thickness and type of the material. | Wear safety goggles to protect your eyes. |
| 2 | Secure the workpiece to avoid movement during drilling. | Use clamps or a vice for stability. | Ensure your workspace is clear of obstacles. |
| 3 | Set your drill to the recommended speed for the hollow bit. | Refer to the manufacturer's guidelines for speed settings. | Keep hands away from the drill area. |
| 4 | Begin drilling at a low speed, gradually increasing as needed. | Start with a pilot hole if necessary. | Use ear protection if drilling for extended periods. |
| 5 | Clear debris from the hole frequently to prevent binding. | Pause periodically to check progress. | Do not wear loose clothing that could get caught in the drill. |
| 6 | Finish drilling, ensuring the hole is clean and smooth. | Use a file to smooth rough edges if necessary. | Dispose of waste materials properly. |
Common Mistakes and Tips for Successful Hollow Bit Drilling Techniques
Hollow bit drilling can be highly effective when done correctly. However, many make common mistakes that hinder success. For instance, failing to select the right drill speed can lead to poor performance. If the speed is too high, it may cause overheating. If it is too low, the drilling process may become inefficient. Finding that sweet spot is crucial.
Another common issue is insufficient pressure. When users don't apply enough force, the bit may struggle to penetrate the material. This can result in uneven holes and wasted time. It’s essential to maintain a consistent pressure throughout the drilling process. Likewise, not keeping the hollow bit clean can lead to blockages and reduced effectiveness.
Finally, some people forget to periodically check their drill bit for wear. A dull bit can produce rough holes and increase project time. Regularly inspect the bit for damages or signs of wear, and replace it when necessary. Drilling successfully with a hollow bit takes practice. Reflecting on past errors is vital for improvement.