shining bright

a British lighting manufacturer with a difference

Obsessed with solving problems, not just selling 'stuff': we were born from a belief that the lighting industry deserved better.

How to Choose the Best Parking Lot Lighting?

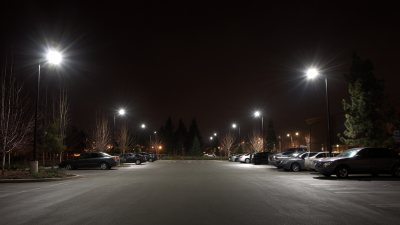
Choosing the best parking lot lighting is not simply a matter of selecting the brightest fixture. A successful design helps drivers recognize cars, curbs, signs, and pedestrians without creating harsh glare. It should also support security cameras and comfortable movement after sunset. In practice, poor choices often become visible during rain. Wet asphalt reflects excessive light, while tree shadows can leave dark pockets near walkways. A useful plan begins with the site itself. Measure the lot, note mounting heights, inspect existing poles, and observe traffic patterns at night. These details often reveal problems that product brochures do not mention.

The fixture should match the location, not just the budget. Review photometric reports, light distribution, color rendering, rated life, ingress protection, and warranty terms. A qualified lighting designer can model spacing and confirm whether illumination is reasonably uniform. Controls may reduce energy use through dimming, scheduling, or motion response, but complicated systems can frustrate maintenance teams. Keep that risk visible. No layout is perfect. A spreadsheet cannot capture every shadow, reflection, or damaged pole. I have seen attractive installations perform poorly because their optics were chosen without visiting the site. Reliable decisions combine measured data, manufacturer documentation, field observation, and feedback from property managers. The right parking lot lighting should feel clear and calm, not painfully bright. It should remain dependable through dust, weather, seasonal changes, and years of routine maintenance.

How to Choose the Best Parking Lot Lighting?

Define Parking Lot Lighting Needs and Site Conditions

Before choosing parking lot lighting, define how the site is used after sunset. Count vehicles, pedestrians, loading areas, entrances, payment points, and accessible routes. A quiet office lot needs different lighting from a busy retail property. Observe the site at night, not only during daylight inspections. Dark corners, tree shadows, wet pavement, and nearby residential windows can change the design.

Record the lot’s dimensions, pole locations, mounting heights, surface color, and existing wiring. A qualified lighting professional can use a photometric study to estimate illumination, uniformity, glare, and spill light. In my experience, uniform light often matters more than extreme brightness. Drivers need clear visual transitions between bright and dim areas. Weather also matters. Rain, snow, dust, and coastal air may affect fixture selection and maintenance. No design is perfect. Recheck assumptions after installation.

Tips: Walk the property with a lux meter and a site map. Mark dark zones and glare sources. Ask security staff where incidents or visibility complaints occur. Plan for cleaning, failed lamps, and equipment access. Controls should match operating hours, but overly aggressive dimming may create uncomfortable changes. Review local safety requirements and electrical standards with a qualified professional before construction.

Compare Light Sources, Fixtures, and Color Characteristics

How to Choose the Best Parking Lot Lighting?

Choosing parking lot lighting starts with comparing light sources, not just counting lumens. LED systems usually provide efficient output, long service life, and quick control response. Traditional metal-halide sources may deliver familiar color, but they often require more maintenance. Their output can also shift as lamps age. A lighting audit should record energy use, mounting height, operating hours, and replacement access. Small details matter.

Fixtures shape how light reaches pavement, vehicles, and pedestrians. Full-cutoff fixtures can reduce upward light and help control glare. Asymmetric optics may place more light across driving lanes, while wider distributions can suit open parking areas. Check the photometric plan for uniformity, not only maximum brightness. Dark gaps near corners can feel unsafe, even when average illumination looks acceptable. I have seen layouts fail because poles were spaced by habit rather than measured coverage.

Color characteristics deserve equal attention. A color temperature around 3000K to 4000K can create a comfortable appearance, while higher temperatures may look harsher. Color rendering affects how clearly people recognize clothing, signs, and vehicle details. A CRI above 70 is common, but the best value depends on site needs. Glare remains easy to underestimate. A bright fixture aimed toward a driver’s eyes can reduce visibility. Testing one mock-up at night is worthwhile, although it may expose flaws in the original design. That is useful, not embarrassing.

Calculate Brightness, Coverage, and Pole Spacing

How to Choose the Best Parking Lot Lighting?

Begin with maintained illuminance, not fixture wattage. The IES RP-8-18 recommends different parking-area levels, commonly about 0.2 to 1.0 footcandles, depending on activity, risk, and user needs. Convert the target into a lighting calculation: average footcandles = delivered lumens × coefficient of utilization × light-loss factor ÷ area Use maintained values, because dirt, aging, and voltage changes reduce real output. A bright point beneath one pole does not prove good coverage. Uniformity matters more.

Pole spacing should come from a photometric plan. As an early field estimate, spacing may range from three to four times mounting height. A 30-foot pole might begin near 90 to 120 feet between poles, but trees, parked vehicles, slopes, and fixture optics can change this quickly. IES RP-8-18 also emphasizes limiting excessive contrast and checking average-to-minimum uniformity. Measure the darkest driving lane, not only the open center. DOE’s 2023 Solid-State Lighting R&D Opportunities report shows laboratory LED efficacy exceeding 200 lumens per watt, yet installed performance is usually lower.

Tips: Keep poles away from vehicle turning paths. Request an isolux diagram and maintained-lumen calculation. Test one section at night. My first layout is rarely perfect; glare, shadows, and unexpected obstructions often expose assumptions that looked reasonable on paper. Verify local requirements before final installation.

Evaluate Energy Efficiency, Controls, and Maintenance

Choosing parking lot lighting begins with more than brightness. In field inspections, I have seen overpowered fixtures waste energy and create harsh glare. Compare delivered lumens, wattage, color quality, and expected service life. Efficient LED equipment is useful, but efficiency alone is not enough. A poor layout can leave dark walkways while flooding empty pavement. Review a photometric plan and test one area at night. Real conditions often challenge the drawing.

Controls can reduce consumption when the lot is quiet. Use timers, photocells, motion sensors, or dimming schedules suited to traffic patterns. Sensors need careful placement. Passing branches or nearby roads can trigger unnecessary lighting. Keep a commissioning record, including settings and override procedures. This helps when staff change. Maintenance should include lens cleaning, pole checks, wiring inspections, and nighttime illumination reviews. Dust, damaged seals, and shifting poles slowly reduce performance. Plan access for safe servicing, and store compatible spare components. I would not promise zero maintenance. Every outdoor system needs attention.

Tips: Ask for measured energy data, not only estimated savings. Walk the site after rain and during low traffic. Check glare from driver height. Set a review date every six months, then adjust controls when usage changes.

Check Safety Standards, Installation Costs, and Long-Term Value

How to Choose the Best Parking Lot Lighting?

Parking lot lighting should begin with safety standards, not fixture appearance. Check local electrical codes, illumination levels, glare limits, and accessibility requirements before requesting prices. A qualified lighting professional can prepare a photometric plan. This shows dark areas near entrances, walkways, ramps, and vehicle lanes. I have seen attractive layouts fail because light stopped at the property edge. Uniform coverage matters more than extreme brightness. Use shielded fixtures to reduce glare for drivers and nearby residents.

Tips: Ask for measured light levels, not just promises. Review the plan at night if possible. Confirm emergency routes remain visible. Include lighting controls, because unnecessary overnight operation increases costs.

Installation cost includes more than the fixture. Budget for poles, foundations, wiring, lifts, permits, labor, and possible electrical upgrades. A cheaper option may require frequent cleaning or early replacement.

LED systems with durable housings, suitable color quality, and dimming controls can reduce energy and maintenance expenses. However, projected savings are not guaranteed. Request a clear estimate for ten years, including inspections and component replacement. That comparison often changes the buying decision.

Long-term value also depends on service access. Fixtures mounted too high may cost more to repair. Choose components with documented performance data and practical warranty terms. Keep records of installation dates and light-level checks. I would not ignore appearance, but safety must lead. One weak corner can undermine an otherwise careful design.

Our story

When The Light Went On

The idea for Acrospire was formed in 2012 when founder Tim envisioned a different kind of lighting manufacturer: one that would not only deliver outstanding customer experiences but also prioritise fair treatment for its employees.

We’ve come a long way

Working from any nook and cranny we could find

Motivated by the belief the industry wanted and needed better, Tim shared his plan to establish his own venture with Hatty, who simply couldn't let him do it alone.

The rest, as they say, is history.

Protecting local jobs and ensuring the best quality possible.

The products sold should, where possible be manufactured here in the UK

Working from a rented office by day and assembling lanterns in a garage at night, Tim and Hatty set to work.

11 Years later

and a lot has changed

Acrospire now inhabits a 14000² ft manufacturing facility in Basingstoke, Hampshire. We’re a proud partner of the Made in Britain scheme, ISO9001 certified and a member of all relevant lighting industry trade bodies.

We've built a reputation to be proud of

Along with great relationships with our customers and a great team! We've attracted some of the most experienced members of the lighting industry, all by following one golden rule.

A simple ethos

Creating work to be proud of

That runs through all that we do. Customers who have made the switch to Acrospire have found working with us to be a breath of fresh air.

Market leading warranty

If you’re a professional in the lighting industry, you’re probably familiar with warranties that range from 3 to 10 years, with extensions available on special request or at additional cost. At Acrospire, where we’re proud to be different, we offer a market-leading simple 12-year warranty, as standard.

Tight Control on Quality

We focus on our customers not our competition. We manufacture our products in the UK: with the exception of our solar products, our supply chain is within a 60-mile radius of our factory in Basingstoke: to maintain greater control over quality. We al

Speed is key

Speed of response is crucial when it comes to resolving warranty issues. If we’ve made a mistake, we own it, get to the root cause, and fix it as quickly as possible. We believe in timely communication with our customers and making the resolution pro

Test and Test Again

We believe in independent testing and certification. Our new product development is in line with ISO 9001. Many of our products hold ENEC Certification. To meet the requirements of ENEC we also send random product samples for third party safety testi

Quality by design

Our product design is another key factor in our ability to offer a 12-year warranty. We value engineer rather than cost cut, never compromising on quality. We stick to our processes and engage with our supply chain to ensure that every product meets